
Browse FAQ
Accessory (2)
Key Differences Between RCA and XLR for DAC to Amp Connection
- Noise & Interference
XLR (Balanced): Offers better noise rejection due to common-mode noise cancellation, especially useful in long cable runs or noisy environments.
RCA (Unbalanced): More susceptible to ground loops and interference, but in a short-distance setup (under 1-2 meters), this is usually not a major issue. - Signal Strength & Voltage
XLR: Typically carries a higher voltage signal (often 4V+), which can result in better dynamic range and a lower noise floor.
RCA: Standard output is 2V, meaning potentially lower signal strength and a slightly higher noise floor. - Audio Quality
In very short distances (<1m) with well-shielded cables, the difference is minimal.
However, some high-end DACs and amplifiers may have better circuitry on their balanced outputs, leading to slightly better performance with XLR. - Ground Loops & Hum
XLR connections help prevent ground loops, which can cause hum or buzz in RCA setups, especially when multiple devices share power sources.
When to Use RCA vs. XLR for High-End Audio
- Use RCA if your system is fully unbalanced, the cables are short (<1m), and you don’t have noise issues.
- Use XLR if your components have true balanced circuitry, and you want the best noise immunity and higher signal strength.
For high-end audio in close distance, XLR may provide a slight advantage in noise rejection and signal clarity, but RCA can still sound excellent if your system is well-designed and interference-free.
Amp & Preamp (4)
In some applications, the speaker outputs from the power amplifier are used as source signals for devices such as REL sub woofer. For such application, usually the receiving devices should have DC offset blocking capability because some amplifier by design has floating ground (DC offset) on the speaker outputs.
The following models have no DC offset on the amplifier speaker outputs and the negative terminal is also the ground:
NuPrime STA-9, MCH-K38, IDA-6, IDA-16, STA-9X, AMG STA
The following models’ speaker outputs can not be connected directly to sub woofer input:
NuPrime Reference 20, ST-10, IDA-8, ST-10M, Evolution One, Evolution Two, Evolution STA, AMG One, MCX-1,2,3,4
REL has provided instructions for connecting Class-D amp with floating speaker outputs to their sub woofers, please contact REL. All currently shipping REL sub woofers can be connected directly to any Nuprime amps.
IDA-8 is an extremely popular and award winning integrated amp. New users are welcome to read this long topic on audiocircle.com: http://www.audiocircle.com/index.php?topic=134697.0
When a device has a 12V trigger input, it is designed to be turned on when a 12V is detected. You can use any standard male to male 3.5mm (3-pin type) cable.
https://components101.com/connectors/35mm-audio-jack
The Tip section is +12V, the bottom Sleeve section is GND, and the middle Ring section is not used. Nuprime’s trigger design uses 3.5mm stereo cable pin 1 and pin 3. A mono trigger cable shorts pin 2 and pin 3, it can be used to connect the Nuprime device to another device’s trigger that only uses a mono cable.
Summary: If an amplifier “doubles” its power into 4 Ohms, it often means the 8-Ohm rating was “under-built” relative to the power supply’s potential. If an amplifier provides the same power into both, it means the power supply is being utilized to its maximum optimized potential at the higher impedance.
Refer to this guide: https://nuprimeaudio.com/power-impedance/
Corporate (2)
Product Pricing
We don’t price our products based on how good they sound, how much weight they have, or how they compare to the competition. We are an engineering company, and we price our products based on the materials, labor, and other expenses that go into them. Innovation and performance advances have reduced the cost of manufacturing. The designs for expensive preamps are now found in mid-priced amps and DACs, costing an order of magnitude less. Similarly, our amplifiers employ a naturally occurring self-oscillating design principle to generate the PWM pulses for Class D sampling rather than incorporating a relatively expensive PWM generator.
Vertically Integrated
Typically a high-end brand works with an OEM factory, including supplier factories, to achieve its target products. It isn’t often that a brand owns its factory. Atypically, NuPrime is vertically integrated: we don’t subcontract for amplifiers and power supplies. Our in-house engineering team makes it unnecessary to spend elsewhere for what we do so well. Our stocked parts range from raw materials and ICs to semi-assembled boards. Any components we require are conceived and achieved in-house. Admittedly, we can’t do it all. On occasion, we partner to develop a product another company does better. In short, NuPrime customers benefit from our R&D, efficiency, and fruitful associations.
We are committed to transparency in our product sourcing. NuPrime makes electronics with parts sourced globally, with roughly 30% of our parts come from US companies. 60% of our gross profits go to worldwide distributors, dealers, support staff, and salespeople. 10% of our gross profits go to Taiwanese factory workers and expenses. The remaining 30% go to engineering, marketing and management staff.
DAC (19)
For a complete history and explanation of USB standard (1.0, 2.0, 3.0, 3.1) and port types (A, B, C, micro, etc), refer to Wikipedia USB article.
NuPrime communicates and decode digital music from the computer through USB Audio (this is a software standard, not physical USB standard). USB Audio is a software standard that defines how audio devices can communicate with the computer to play music. The USB standard and port type set the physical properties of how devices are to be connected to the computer and the speed limit.
The USB communication is always between a host and a client devices. Some devices such as smartphone or tablet can act as USB host or client device. When a smartphone is connected to the computer, it functions as a client device to the computer. Printer and USB hard drive are USB client devices. Client devices can not work with each other, unless one of the device has the capability to become a host. NuPrime’s DACs (including Digital Integrated Amp) are all USB client devices and they are designed to play music from computer, smartphone or tablet.
Some of the NuPrime models come with two Type-A ports. One of the ports is a standard USB 2.0 port (for audio, USB 2.0 is the standard and USB 3.0 is backward compatible with USB 2.0) for USB audio use. The other port is a proprietary NuPrime digital port that uses the same USB Type-A connector. It is not a USB standard! NuPrime wireless devices (Bluetooth dongle, WiFi audio receiver) use this custom digital port for 5V power as well as digital music signals (in S/PDIF format). For example, if NuPrime WR-100 is to be connected with a non NuPrime DAC, it would have to be powered by a 5V power adapter and connect its optical S/PDIF output to the DAC. But if WR-100 is connected to NuPrime IDA-8 or DAC-9, a single cable is all that is needed.
USB 3.0/3.1 is also compatible with USB Type-C, the latest plug design that’s just starting to gain adoption. This reversible plug is distinct from USB 3.1, though manufacturers may choose to support both at once. For example, the 2015 MacBook and the second-gen Chromebook support the USB 3.1 standard on their Type-C ports, while the OnePlus 2 uses the USB 2.0 standard despite a Type-C port. Don’t confuse the USB standard with the port type.
USB Host & USB Client
USB Audio is a standard for digital audio used in PCs, smart phones and tablets to interface with audio peripherals. The source device that produces the data is called the USB Host and the receiving end is the USB Client. So, if a smartphone is connected to a computer, the computer is the host and the phone is a client. But if a DAC is connected to the smartphone, then the phone is now the host and the DAC is the client.
Audio only needs USB 2.0
Most USB audio interfaces are USB 1.0 and USB 2.0 compatible, so you should have no problem getting a device to work with any computer manufactured in the last 5 years. A USB audio interface attaches to the computer with a standard USB connector and to the device itself with any number of other connectors, ranging from proprietary connections to standardized connections. USB Audio devices do not need the bandwidth of USB3.0 and USB3.0 is backward compatible with USB2.0. USB 2.0 can handle bandwidth of 480 MB/second. To put this into perspective, 24 bit/192 khz audio–the highest bandwidth in commercial use–uses approximately 10 MB/second per track of audio. So, a stereo recording would take approximately 20 MB/second or 5 percent of the possible USB 2.0 bandwidth. This large amount of bandwidth available allows for USB audio interfaces to accommodate just about any recording or playback scenario imaginable.
Setup
Steps to setup your computer to use external USB Audio device such as a DAC (Digital to Analog Converter):
- Connect the USB Audio device to the computer (before installing any device driver).
- Install the Windows device driver if it is required (Mac computer does not need to install USB Audio device driver)
- Go to the System Preference/Setup and look for Sound device setup. Choose the desire USB Audio device (e.g. NuPrime uDSD, Encore mDSD, …)
- For further information about how to configure the music player software for high resolution music playback, download this user guide: https://nuprimeaudio.com//images/productpage/NuPrime-USB-Playback-Guide.pdf
- Occasionally Windows users might encounter driver error or not able to install certain device driver files. This is usually due to conflict with previously installed driver. Unfortunately there is no simple solution to this problem. Try the following steps:
- Uninstall NuPrime USB audio device driver.
- Go to Device Manager and look for any USB audio device driver (or any device driver) that has an error mark next to it.
- Delete the driver.
- Install NuPrime USB audio device driver again.
DAC’s Volume Control Basic
A DAC typically has a mix of analog and digital inputs. Some DACs convert the analog input into digital to utilize the DAC’s internal digital volume control and inputs selection, avoiding expensive analog preamp and volume control as described above. The performance degradation of the analog input that has to go through A2D, volume adjustment, and then D2A depends on the implementation, which is beyond the scope of this discussion. Digital inputs, on the other hand, should go through the high-end DAC’s internal volume control for best performance. Therefore it makes sense to best adjust the volume in the digital domain for digital signals and use an analog preamp and volume control for analog inputs.
High End Analog Volume Control Basic
In traditional pure-analog designs, a switch-resistor network for volume control works best but is very expensive due to many high precision discrete resistors. Next is a high-quality volume pot. You rotate the Pot to change resistance, which in turn attenuates volume. A volume pot is non-linear and has balance issues at low volume.
All the NuPrime high-end DACs and Integrated Amps use a mixed analog and digital volume-control design. The digital volume control’s 0.5db steps are sent to the DAC for the best possible result.
The DAC’s analog output and analog inputs from other sources then go through a low noise and low distortion resistance ladder circuit design (implemented as an IC) similar to switch-resistor network.
In conclusion, we feel we’ve developed the best type of mixed digital and analog volume control and preamp for a modern DAC.
It depends on how good the volume control on your preamp or integrated amp is. Basically you want to set the volume of the less accurate preamp as high as possible (90% of maximum for example) and use the better preamp to make the fine adjustment. If both are equally good, set both to around 0db (mid-point). It is easier to test your preamp at low volume. Set DAC-9X to near maximum volume and try it out with your integrated amp. Does the music sound well detailed at very low volume? Do the opposite and compare again.
Using Bluetooth and WiFi Audio Receivers and Dongles
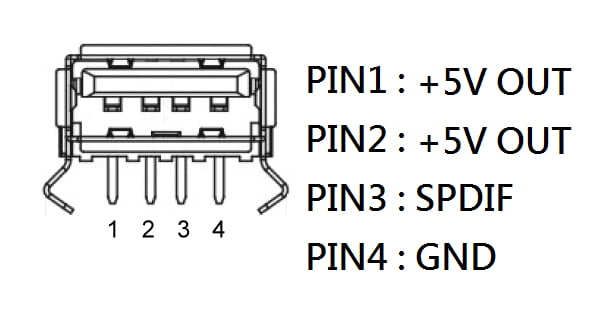
NuPrime defined an USB Type-A port to carry S/PDIF data and 5V power for connecting to external wireless audio receiver using just one standard USB cable.
Compatible Nuprime wireless receivers:
- NuPrime BTR-HD (Bluetooth aptX HD)
- LP10 Nuprime Edition (Google Cast, AirPlay, Tidal, Spotify, Qobuz, and other music services)

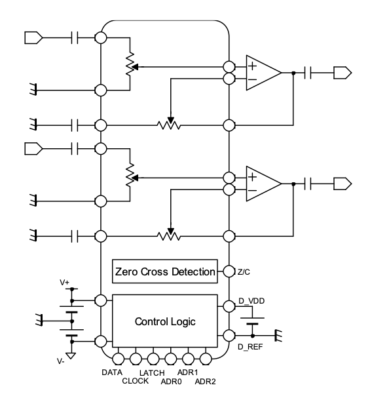
Our DACs follow the standard XLR pinout.
Pin 1 = Ground; Pin 2 = HOT (+); Pin 3 = COLD (-)
We recommend JRiver Media Center for its ease of use and setup. Please refer to this setup guide: https://nuprimeaudio.com//wp-content/uploads/JRiver-Configuration-for-DSD-Playback.pdf
For Foobar please refer to this general purpose USB audio playback guide: foobar2000_dsd
Use the settings of MQA Core Decoder option in Roon. The options that work are: “decode and render” and “decode only”. Decode and render option should provide a better sound.
DAC-10 / 10H line out can be turned off by holding the Mute button for 3 seconds. The line out will not automatically turn off when the headphone is inserted because there are multiple headphone outputs.
To enable the line out again, press and hold the Mute button for 3 seconds.
If you are not familiar with USB audio device, please read the FAQ topics on “What is USB Audio and how do I configure Windows or Mac computer for USB audio and the DAC ?” and “USB Standard and Ports”
The standard USB audio cable that comes with your iOS or Android device can not be used to connect the DAC. You will need a different cable that treat the iOS or Android device as the host, and the DAC as the client.
- iOS device – use a genuine or Apple MFI approved USB Camera Adapter cable
- Android device – use a quality USB OTG cable
iOS Device
USB Audio has always been supported by iOS. You can use Apple USB Camera Adapters to import photos from your digital camera. You can also use Apple USB Camera Adapters to connect other USB devices to your iPhone, iPad, or iPod touch. If you’re using an Apple USB 3 Camera Adapter, you need an iPad with iOS 9.3.
Some USB devices need more power than your iPhone, iPad, or iPod touch can provide. If you connect one of these types of USB devices, you might see an alert that says “attached accessory uses too much power.” Try one of these steps:
- Connect the USB devices to a powered USB hub or secondary power source.
- Use a Lightning to USB 3 Camera Adapter. The Lightning to USB 3 Camera Adapter has a built-in lightning port, which you can connect to a USB power adapter. This provides power to your iOS device and connected USB device.
Android Device
Prior to version 5.0, the support for USB audio is spotty. Some device manufacturers do a better job than others. In general, Android OS 4.1 and above provide support for USB audio device. If you have doubt, check with your device manufacturer or search for help online. Please do not ask our support staff. In general, similar to iOS device, if the DAC is connected and functioning properly, the Android OS will send the audio to the USB port. There is no need for any system configuration.
We strongly recommend USB Audio Player PRO for high resolution music playback.
Similar to iOS device, if your USB device consumes more power than allowed by Android device, you will need to power the USB device. If you are technically inclined, here’s a useful article: http://source.android.com/devices/audio/usb.html
Powered USB DAC
NuPrime DAC-10/10H, DAC-9, IDA-16, IDA-8
Externally Powered USB DAC
- NuPrime uDSD – should always be connected to computer or a powered USB hub
- Encore mDSD – can be connected to mobile iOS or Android devices directly, provided that the headphones used do not draw too much power. mDSD should be connected to headphone before connecting to the mobile device. If you don’t hear any sound from iPhone or iPad, try to lower your iDevice system volume, then pressing the mDSD volume up first, then increase the system volume.
How to connect to a powered USB hub – you will need a USB Type A to Type A cable for connecting the Android USB OTG Cable or Apple Camera Adapter Cable to the USB hub.
There are two ways to determine the sampling rate:
- Use meta data from the source music. If the meta data is wrong or the source does not contain any sampling rate data, then NuPrime device will not display the correct sampling rate. Even if the display does not show the correct sampling rate, the decoding will not be affected. The actual sampling rate is detected during the decoding process. Products using this method are: IDA-16, DAC-10 and uDSD
- Use SRC (sampling rate converter implemented in FPGA) to detect the clock of the source music to determine sampling rate. Products using this method are: IDA-8, IDA-6 and DAC-9.
The sampling rate is displayed during the following conditions:
- When an input is first selected, the Input Number and Sample Rate are displayed. Unless there is a change in input or sampling rate, the initial sampling rate will not be displayed again.
- The sampling rate is displayed whenever there is a change in Input Source or music sampling rate.
Then follow this application note: https://www.synology.com/en-global/knowledgebase/DSM/help/AudioStation/playmusic
“Enable high quality output for USB speakers” should be selected in the Audio Station’s Advanced Setting.
All the Line Outs or Subwoofer Outputs from all the DACs and Integrated Amps are full range.nnThe subwoofer outputs from home theater products are filtered according to the device setting.
1. Check the Sound setting in the Control Panel. Verify that the NuPrime DAC is selected. If it is not showing, the device driver was not installed correctly.
2. Go to Device Manager to check the USB audio device driver is installed and without any conflict. Remove conflicting USB audio devices. There are several places to check:
a) The NuPrime USB audio device listed under Device Manager.
b) In Device Manger, in “Sound, video and game controllers”, there should be a NuPrime USB audio device. Check that there is no “error status”. Right click to “Update Driver Software” if the status is “error”.
3. Reboot computer.
4. Check that your USB cable is not defective.
WASAPI – Applications communicate with the audio driver through Sessions, and these Sessions are programmed through the Windows Audio Session API (WASAPI). In general, WASAPI operates in two modes. In exclusive mode (also called DMA mode), unmixed audio streams are rendered directly to the audio adapter and no other application’s audio will play and signal processing has no effect. Exclusive mode is useful for applications that demand the least amount of intermediate processing of the audio data or those that want to output compressed audio data such as Dolby Digital, DTS or WMA Pro over S/PDIF. WASAPI exclusive mode is similar to kernel streaming in function, but no kernel mode programming is required. In shared mode, audio streams are rendered by the application and optionally applied per-stream audio effects known as Local Effects (LFX) (such as per-session volume control). Then the streams are mixed by the global audio engine, where a set of global audio effects (GFX) may be applied. Finally, they’re rendered on the audio device.
Audio Stream Input/Output (ASIO) is a computer sound card driver protocol for digital audio specified by Steinberg, providing a low-latency and high fidelity interface between a software application and a computer’s sound card. Whereas Microsoft’s DirectSound is commonly used as an intermediary signal path for non-professional users, ASIO allows musicians and sound engineers to access external hardware directly.
Some entry level consumer devices have optical outputs with high jitter and that can affect the locking of optical signal with some model of NuPrime DAC. If this is determined to be the problem, you can use an optical to analog converter such as “Musou Digital Optical Coax to Analog RCA Audio Converter Adapter” (available from Amazon.com) to convert the noisy optical signal to the DAC’s analog RCA inputs.
If your Windows USB audio is not working, go through the following diagnostic:
- Download and run Windows USB Troubleshooter
- Following these manual troubleshooting steps.
To rule out any hardware failure, you should also verify that the NuPrime product is working with another computer.
Mac OSX does not support native DSD. It only supports DoP (DSD over PCM). Since encoding DSD into DoP requires twice the bandwidth, when using NuPrime’s DAC with Mac OSX, the support of DSD is limited to half of the maximum decoding capability of the DAC.
From Audirvana:
“To listen to DSD files from a DAC, Audirvana Plus transmits the DSD files to the DAC using the “DSD over PCM” protocol that requires markers, and using this protocol requires twice the bandwidth over the native DSD signal only. In order to get the best possible result, you need to use Audirvana Plus with a Native DSD DAC. However, if your DAC is not DSD compatible, Audirvana Plus will perform downsampling to PCM using a very high quality 64 bit algorithm.
Please note : The “DSD over PCM” protocol requires markers to identify the signal as DSD, so using this protocol requires double the bandwidth compared to the native DSD signal alone. This can reduce the maximum DSD frequency that can be used with DAC by half compared to the frequency that can be reached under Windows. This may explain why a DSD 512 DAC can stop at DSD 256, and DSD256 DAC can stop at DSD128.”
“DoP is a method to encapsulate DSD native signal in PCM stream. There is no conversion to PCM. It is true DSD signal, just that OSX thinks it is PCM. The DAC recognises it correctly and decodes the DSD signal. So DSD over PCM 1.0 is the correct setting”.
I2S format was used by several high end companies for digital data transfer between components but there is no industry standard. You have to compare the Nuprime I2S pins spec with other brand’s spec to ensure compatibility.
All Nuprime CD Transport I2S (IIS) Pinouts
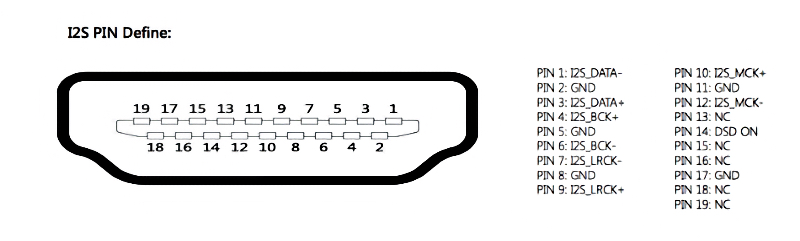
Usually most of the pins are compatible except PIN 14. If you have to choose a non Nuprime component with I2S port, please compare every pins (pins with NC are not used). We are unable to confirm or test other brand’s I2S compatibility.
All Nuprime DAC’s I2S (IIS) Pinouts

Home Theater (9)
Please download the latest firmware for HD-AVP and HD-AVA.
- Go to OSD setup.
- Select Setup tab, then Input Config and then Input setup.
- Go to Tuner setup.
- Choose your desire frequency station you wish to store as preset. Once the frequency is selected, go to Memory option: “Choose your desired station. 50 preset stations”
#define REMCODE_OFF 0x02
#define REMCODE_ON 0x20
#define REMCODE_DIRECT 0x0e
#define REMCODE_STEREO 0x13
#define REMCODE_MODEDN 0x11
#define REMCODE_MODEUP 0x19
#define REMCODE_INPUT1 0x1f
#define REMCODE_INPUT2 0x03
#define REMCODE_INPUT3 0x04
#define REMCODE_INPUT4 0x05
#define REMCODE_INPUT5 0x1c
#define REMCODE_INPUT6 0x06
#define REMCODE_INPUT7 0x07
#define REMCODE_INPUT8 0x08
#define REMCODE_Bluetooth 0x09
#define REMCODE_AMFM 0x0a
#define REMCODE_HD5 0xFE
#define REMCODE_HD6 0xFD
#define REMCODE_OPT2 0xFC
#define REMCODE_COAX2 0xFB
#define REMCODE_AN2 0xFA
#define REMCODE_AN3 0xF9
#define REMCODE_AN4 0xF8
#define REMCODE_EXT71 0xF7
#define REMCODE_USBPLAYER 0xF5
#define REMCODE_PLAY 0x00
#define REMCODE_FREQUP 0x1D
#define REMCODE_FREQDN 0x0b
#define REMCODE_CECSKIPDN 0x1E
#define REMCODE_CECSKIPUP 0x01
#define REMCODE_MENU 0x14
#define REMCODE_OK 0x18
#define REMCODE_HOME 0x10
#define REMCODE_AUDIOMENU 0x15
#define REMCODE_RETURN 0x49
#define REMCODE_DOWN 0x12
#define REMCODE_UP 0x16
#define REMCODE_RIGHT 0x0c
#define REMCODE_LEFT 0x17
#define REMCODE_EXIT 0x4a
#define REMCODE_INFO 0x50
#define REMCODE_OPTION 0x4d
#define REMCODE_INPUTUP 0x0D
#define REMCODE_VOLUP 0x4b
#define REMCODE_VOLDN 0x4f
#define REMCODE_A 0x1b
#define REMCODE_EQ 0x44
#define REMCODE_B 0x42
#define REMCODE_HD2_OUT 0x1A
#define REMCODE_C 0x40
#define REMCODE_DIM 0x5a
#define REMCODE_D 0x48
#define REMCODE_MUTE 0x45
#define REMCODE_REPEAT 0x57
#define REMCODE_SLOWPLAY 0x43
#define REMCODE_CECFASTDN 0x51
#define REMCODE_CECFASTUP 0x52
#define REMCODE_CEC_SubTitle 0x5b
#define REMCODE_CEC_Audio 0x47
#define REMCODE_CECSTOP 0x4C
#define REMCODE_CEC_PlayPause 0x4E
If you are using a Pronto IR remote control, replace “0x” in the above code to “20bf”. If still does not work, replace 0x with FD04.

These are all marketing descriptions.nnBass management is the LFE in the audio setting (OSD setting > Setup > Speaker Setup > LFE Level)nn”Increasing the performance of single/double post positioning devices” and “comprehensive cross-over design” means there are variety of settings you could configure the unit to suit your system, such as speaker range/position, speaker size, speaker level, etc.
These are manufacturer preset values that have no meaning to end users. It was part of development setup that should have been removed. This setup will be removed in future firmware update. Please ignore them.
Playback from hard disk or DLNA (LAN) can only support up to 1080P resolution. Playback from HDMI support HDMI 1.4 4K but not HDMI 2.0 4K. The HDMI 1.4 specification supports 4K formats: 3840 pixels wide by 2160 pixels high @ 24Hz | 25Hz | 30Hz 4096 pixels wide by 2160 pixels high @ 24Hz
Pure Direct and Pure Audio modes are part of the multi-channel mode and utilize the high quality multi-channel DAC. USB Audio goes through a separate high performance stereo DAC board.
Pure Audio is a 2-channel Stereo mode where multi-channel inputs from the source are converted to 2 channel audio. Pure Direct is a pass-through (from the source device such as BluRay player) mode without any EQ effect.
Don’t confuse Pure Audio or Pure Direct with USB Audio input. If you have a computer connected to HD-AVP through USB Audio, by selecting the USB Audio as input source you will be utilising the high-end stereo DAC (this USB Audio DAC has the same performance as NuPrime DAC-10) instead of the multi-channel DAC for surround sound decoding.
The L&R outputs from 7.1 outputs come from USB DAC outputs or AVP outputs. The USB L&R outputs come only from the USB DAC. That means if you are using USB Audio as the input, there are two sets of outputs: L&R outputs from 7.1 outputs and USB L&R outputs. This allow you to setup a separate high-end stereo system in another room. Therefore, if you select USB Input as the source, then the USB DAC outputs go to 7.1 L&R RCA and XLR and USB L&R outputs.
HD-AVP includes the same high performance USB DAC implementation as DAC-10, but DAC-10 consist of a better preamp design using switch resistor technique. DAC-10 also includes other digital inputs that go through the same DAC.
In the HD-AVP, only the USB input goes through the stereo DAC for pure 2-channel audio and the other digital inputs are decoded by the multi-channel DAC within the AV processor circuit. In summary, the HD-AVP has a USB DAC that is close to the DAC-10 performance, but offer many additional media server and AV processing features.
Overall, HD-AVP offers tremendous value by combining high quality AVP and 2-channel stereo in a single chassis.
Network & Wireless Audio (2)
Omnia WR-1 will appear as a Roon speaker/receiver.
NuPrime’s family of streaming products complete your TIDAL high fidelity music experience. Add speakers to the Omnia A300SE Streaming Integrated Amp or pair the Stream-9 transport with a high-end DAC. NuPrime also offers the NuPrime Omnia Stream Mini, Stream Mini DAC, and other products to satisfy all your streaming needs.
User Guide
Player & Media Server (1)
I2S format was used by several high end companies for digital data transfer between components but there is no industry standard. You have to compare the Nuprime I2S pins spec with other brand’s spec to ensure compatibility.
All Nuprime CD Transport I2S (IIS) Pinouts
Usually most of the pins are compatible except PIN 14. If you have to choose a non Nuprime component with I2S port, please compare every pins (pins with NC are not used). We are unable to confirm or test other brand’s I2S compatibility.
All Nuprime DAC’s I2S (IIS) Pinouts
Power Supply (10)
Some models do not use automatic worldwide AC switching power supply and therefore require that the AC switch be set to the correct voltage. There are only two positions for the AC switch: 100/115V or 230/240V. Use the tip of a pen to push the switch either Up or Down firmly. It is located near the AC socket on the back panel. All items shipped from the factory are set to 230/240V by default.
If you are hearing noticeable (i.e. about 5 feet away from the speaker) noise, the first step is to determine the source of the noise. The high-frequency noise and grounding flaws created by custom modifications or aging upstream components such as a CD player, D/A converter, or preamplifier may be audible as a loud hissing or buzzing noise. Typically humming noise is the result of grounding problem and hissing noise is caused by switching noise from external device (most likely from computer or its power supply). The first step is to start by disconnecting source devices one at a time until the noise disappears.Sometimes section of an old home might not have proper AC ground and the noise is coming from other household appliances. If you are unable to determine the source of the noise within the chain of audio components, and the noise can be heard by simply connecting the power amp and the speaker (without any upstream components), try other power outlets in the house and always use a quality power strip with noise filter.
Even if the source of the noise has been found, removing it is a challenge. Below are some common cases:
- Computer switching noise passing through USB cable – the noise could be coming from the USB cable shield or ground pin. Try to use a powered USB hub and quality USB cable. There are high-end USB noise isolation devices but keep in mind that a cheaper solution might be to upgrade your computer.
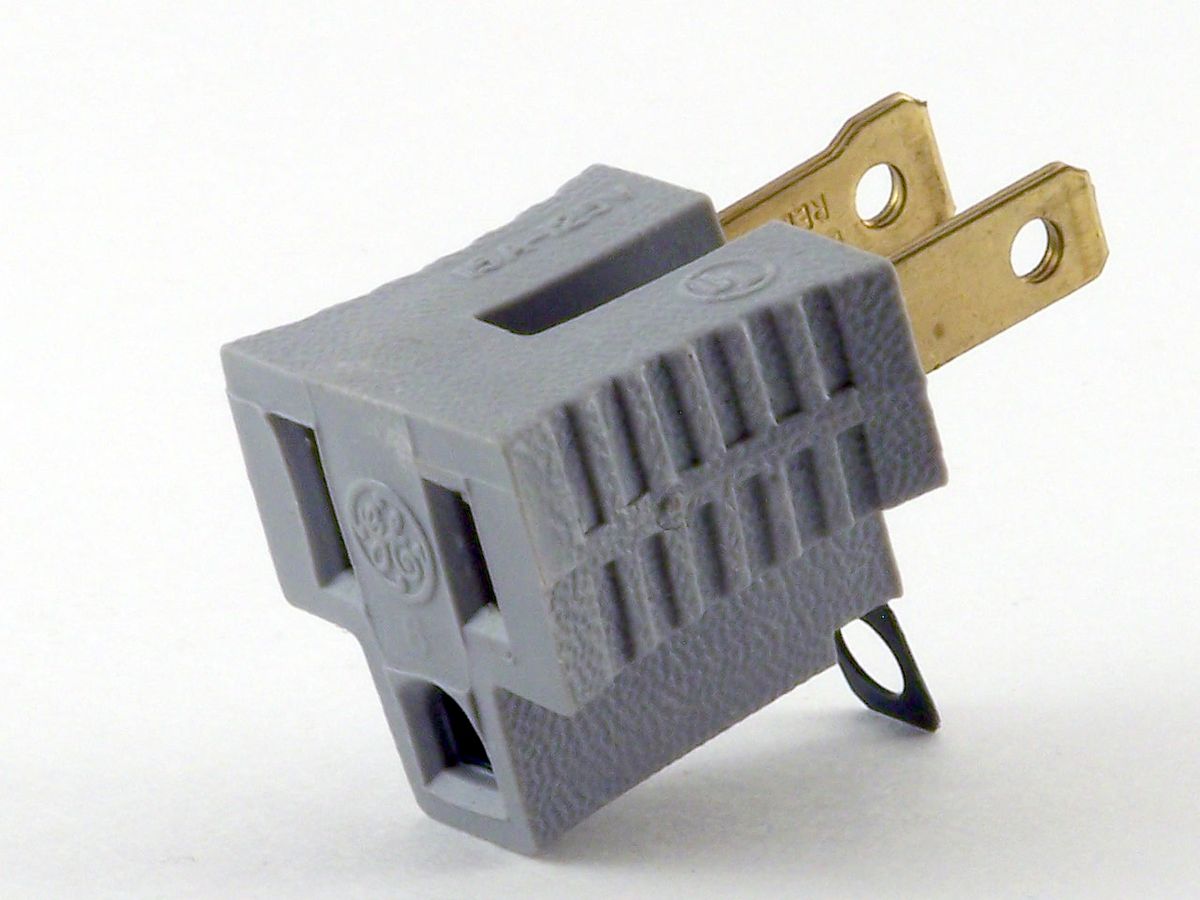
- Grounding conflict between components – this can be caused by poorly or incorrectly designed ground wiring that allowed noise from one component to affect another through the common ground in the system. Therefore a simple solution is to “cut off” or isolate the ground of the offending component from other parts of the system. This can be accomplished by using a “cheater plug” – an AC ground lifter or three-prong/two-prong adapter.

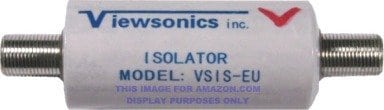
- If the ground loop noise is caused by cable TV set-top-box, a ground loop isolator such as the Viewsonics VSIS-EU Cable TV Ground Loop Isolator (available on amazon.com)
For 110V AC, we recommend Tripp Lite Isobar power strip.
Use energy saving power strip such as “Tripp Lite 8 Outlet Eco-Surge Protector Power Strip” where turning on the master device will turn on all the source devices. Tripp Lite power strip also comes with good noise filter. Another type of power strip such as “Belkin 8-Outlet Conserve Switch Surge Protector with 4-Foot Cord and Remote” is also highly rated by consumers.
The following fuses are used in our products:
MCH-K38 T10A
IDA-16 T7A
IDA-8 T3A
STA-9 T3A
DAC-9 T1A
HPA-9 T1A
ST-10 T5A
DAC-10 T2.5A
REF-20 T5A
All the fuses have the same size: 5x20mm
There is two side to a coin. An entry level amp has 200W@4 Ohms and 100W@ 8 Ohms. But why not design an amp that also raise the performance and power with 200W@ 8 Ohms? This is exactly what NuPrime does with amps design.
Another fact is that NuPrime’s amps are capable of more power than the spec suggested. So if 4 and 8 Ohms are specified at 100Wx2, that means the power supply is a 200W PSU. And we are extremely conservative about our power rating (we provide conservative RMS rating, not peak power). A customer reported 180W for IDA-8 because he is using just one channel to do the measurement. So, if IDA-8 is in a bigger case, and we put in a 300W PSU, you will see a higher rating. In reality, you get more than 100W per channel from the 200W PSU, because not both channels are driven at the same time.
Why don’t we put in a bigger PSU? Each model is designed for specific product position and adding more power will certainly increase the cost and size of the product.
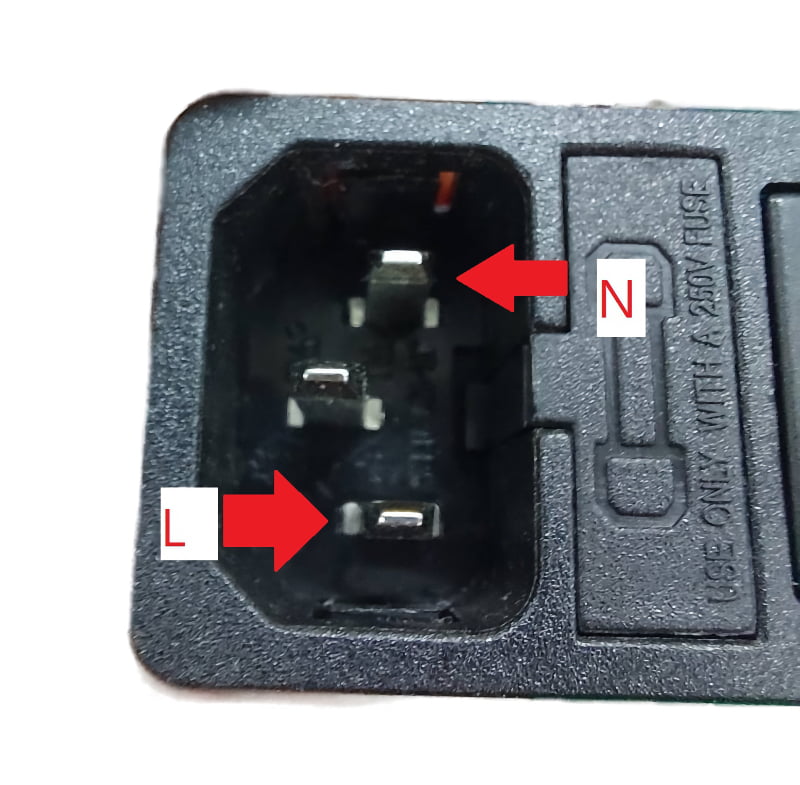
The GND pin of the AC Inlet is connected to the common ground of the chassis.
They are as shown in the photo. N for neutral, L for live.
Summary: If an amplifier “doubles” its power into 4 Ohms, it often means the 8-Ohm rating was “under-built” relative to the power supply’s potential. If an amplifier provides the same power into both, it means the power supply is being utilized to its maximum optimized potential at the higher impedance.
Refer to this guide: https://nuprimeaudio.com/power-impedance/
LPS-205 – any device that can be powered by 5V/2A. This includes Omnia Stream Mini, Stream Mini DAC, Omnia WR-1, Omnia SW-8.
LPS-212 – any device that can be powered by 12V/2A or 12V/A. This includes CDT-9, Omnia S1.
Service (2)
Refer to this service guide:
If you are a service shop located outside of USA, follow the steps below:
- Contact support@nuprimeaudio.com to obtain the parts price.
- Create an account on b2b.nuprimeaudio.com and place your order using this link (list each part separately): https://b2b.nuprimeaudio.com/product/misc-parts/
- Your initial invoice (purchase order) will not include prices. We will review the order, update it with pricing, and add the shipping cost.
If you can perform the service yourself or with a technician, follow the same procedure but use this link instead.: https://b2b.nuprimeaudio.com/product/service-and-parts-order-for-retail-customer/
Speaker (1)
What is speaker’s Sensitivity ?
It is defined as the loudness in dB measured at 1 meter from the speaker when one watt is being applied to the speaker. Let’s say the spec reads 90 dB. A scale would look something like this:
90 dB = 1 watt
93 dB = 2 watts
96 dB = 4 watts
99 dB = 16 watts
102 dB = 32 watts
105 dB = 64 watts
108 dB = 128 watts
111 dB = 256 watts
For each 3 dB gain (the amount that your ears can hear as a change), you have to double the wattage. In our example, a 100 watt amplifer would drive your 90 dB sensitive speaker to a maximum output of 105 dB. Anything above that would probably be distortion.